How to Design Retail Interior that Encourages Customers to Buy
There are countless ways to approach how you design your retail space because retail’s been around for a long time. To increase sales, all shops should be aware of a few standard design techniques.
To assist retailers in thriving in the current digital era and becoming more successful, we have been looking at numerous retail design best practices. The devil is in the details when it comes to retail, from expressing your brand’s narrative and providing engaging shopping experiences to putting together eye-catching window displays and signage necessities.
Uncertain about where to begin with your store design? Here, we’ll take a closer look at some of the fundamentals of designing retail interiors that will draw more customers into your establishment, entice them to browse a wider selection of goods, and motivate them to make a purchase.
As you read, keep in mind that wise retail design choices have a direct impact on sales from the minute a customer enters your store until they choose to check out (or leave your business without making a purchase). We’ll discuss how you can make choices that increase sales.
Design of stores’ interiors
How you set up and design your storage area is known as retail interior design. Your retail design is in charge of luring customers into your establishment, directing them through it, encouraging them to interact with your goods, and eventually persuading them to make a purchase.
You might initially assume that retail design just applies to the way you merchandise your goods. Merchandising is undoubtedly a crucial aspect of shop interior design, but it’s not the only one (as we’ll discuss below).
Every aspect of your store, from the lobby to the checkout display, has the potential to influence a customer’s decision to buy. Because of this, retail interior design is relevant to your complete retail location.
Tips for retail design
The following store design advice can assist you in drawing clients and creating an environment that encourages browsing and making purchases.
Use color sensibly.
You understand exactly what I mean when I say “Target crimson,” “Home Depot orange,” or “Starbucks green,” don’t you? More often than they are aware, consumers have emotional connections to colors; for example, color accounts for well over half of first impressions in the first seven seconds.
While a colorful store can foster a cheery, enjoyable shopping experience, too much color can be overpowering and drive customers to leave the store early. Customers may find it challenging to focus on your merchandise long enough to purchase due to sensory overload. If customers don’t enjoy the aesthetics of your store, it’s also doubtful that they will return.
Consider carefully using color in your retail design to prevent this. Think about color psychology. For instance, the color black, which is frequently used in men’s apparel stores, conveys sophistication and authority.
Red attracts attention and promotes impulsive buying. (Anyone for Target?) However, blue symbolizes security, trust, and tranquillity, which is why many banks choose it.
Last but not least, let your items’ use of color speak for itself. Refrain from including extra colors in your decor, carpeting, or signage. Less is usually more in the retail industry.
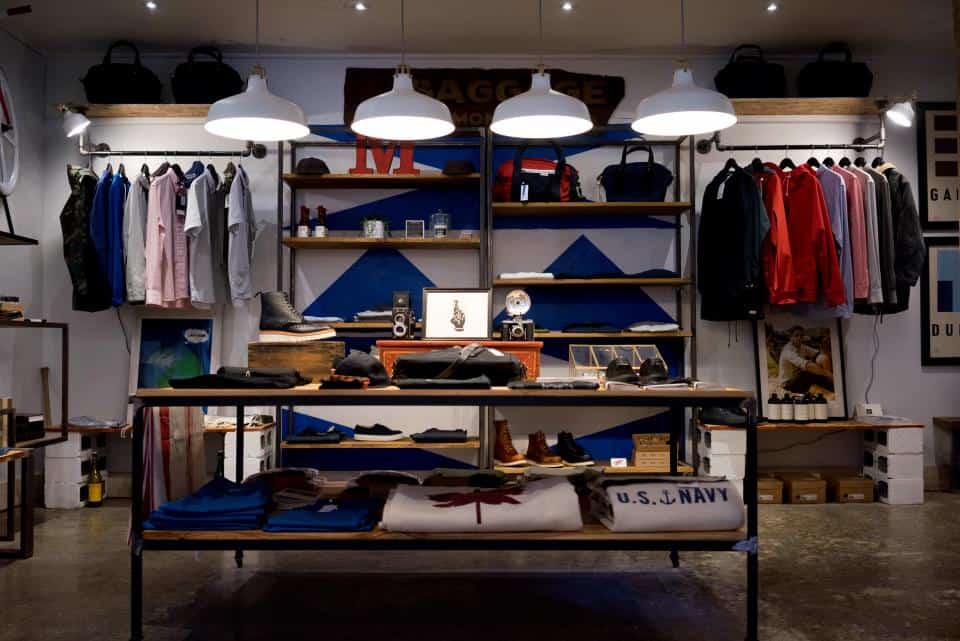
Regularly update product displays
It has been demonstrated that product displays, often known as visual merchandising, boost sales. Customers can see your products “in motion” by looking at a hanging plant, a set living room, or a dressed mannequin, which can influence their purchasing decisions.
Displays offer easy options for user-generated content and interactive shopping experiences, which we’ll touch on later. Displays that are visually appealing entice customers to post pictures of your store on social media.
Window displays, checkout displays, point-of-purchase displays, and mannequins are the most typical types of displays used in retail design. Update product displays frequently to keep your storage space visually appealing and to bring new products to customers’ attention.
Step up to the line
Customers move into the threshold region, sometimes referred to as the “decompression zone,” as soon as they enter your store. Depending on the overall size of your store, it often consists of the first five to fifteen feet of space.
It’s also where your clients transfer from the outside world and have their first interaction with your products. At this time, customers are also making key assessments about your store, including how pricey or inexpensive it is and how well your lighting, fixtures, displays, and colors coordinate.
Customers are likely to miss any merchandise, signage, or carts you position at the entrance to your store because they are in a transitional state.
As a result, your retail design should welcome customers rather than overwhelm them. Give them a quiet welcoming area or a subdued welcome display. Before customers decide to visit your store, provide useful signage near the entrance or farther inside.
Right after that
The next time you enter a store, take attention to your first step because, depending on how the business is set up, you probably turn right. Many consumers do. The first wall consumers view after entering and possibly turning right is frequently referred to as a “power wall,” a high-impact first impression vehicle for your goods. Pay special attention to what you select to exhibit and how you present it in this area of your store.
Whether you’re displaying or staging new or seasonal things, high-profit or high-demand products, or products that tell a story, you’ll want to make sure you grab your customer’s attention.
Visit Pinterest for some fantastic images and ideas for your power wall display.
Create a route for your customers.
Make sure your clients have a clear path through your store by using furniture, displays, racks, and other items. Depending on the dimensions and layout of your store, the exact path will change significantly.
You are aware that most clients will, however, naturally make a right turn. Your responsibility is to make sure that they stay in your store and look at more of your offerings when they do so.
A carefully planned shopping route not only improves the likelihood that customers will make a purchase but also deftly manages the ebb and flow of foot traffic through your store. This can assist you in better managing your store, measuring shopper involvement, and anticipatorily managing busy shopping seasons.
To direct clients to the back of the store and then back to the front, most businesses adopt a counterclockwise path. Where the eyes go, the feet will follow is a proverb that some store designs honor by covering the path with a different texture from the flooring overall. (If the yellow brick road from The Wizard of Oz comes to mind, you are not alone.)
In the end, you want to use your clients’ purchasing paths to guide them somewhere. Consider placing an attention-grabbing exhibit at the end of your aisles as a result.
Slow them down, though.
The last thing you want is for arriving clients to rush by your properly merchandised and cross-merchandised products after all the work and attention you’ve put into them. This ultimately reduces the range of goods they’ll buy.
The creation of “speed bumps,” breaks that force customers to pause, is one method businesses address this. These can be anything that provides clients with a visual break, from signs to special/seasonal exhibits.
“Merchandise outposts,” customized display fixtures with products near the end of or in between aisles, are used by the majority of businesses. These displays support surrounding products on display while promoting impulsive purchases.
Nevertheless, it’s still necessary to consider organizing things in a way that makes sense from the standpoint of a shopper for individuals who don’t have “aisles” per se. Keep “higher-demand” products visible at eye level, and display lower-grossing items below or above eye level.
Finally, it’s advised that you switch up these speed bumps once a week or more frequently to maintain a sense of surprise for repeat visitors. As speed bumps, think about utilizing interactive or visual merchandising displays—I discuss them below.
Maintain client comfort
You may already be aware of the “butt-brush effect,” as Paco Underhill, a consumer behavior specialist, called it. He found that the majority of customers, especially women, avoid shopping in aisles where they might brush on the behind. Even when a buyer is fervently interested in a certain product, this is still true.
Making sure that your aisles and displays provide customers with more than enough personal space to browse your products will help you easily avoid this issue.
Incorporate waiting rooms with comfortable benches and seats to make your store more inviting and entice consumers to stay longer. This is useful for customers who are accompanied by a companion or child who isn’t planning to make a purchase. To ensure that customers still think of your products when they are waiting, have your seating area facing your inventory.
Finally, look them up (not literally)
You could ponder the optimal location for your checkout counter and point of sale in your shop design for days. A solid general rule of thumb is that your checkout should be situated at a logical conclusion to the shopping journey you’ve purposefully created.
The front left is usually the best place for your checkout counter if clients naturally turn right when they enter.
Use your best judgment to determine the most logical location for that checkout counter. Because this choice also depends on the size and structure of the store itself.
It’s crucial to be able to oversee everything from your checkout counter if you’re a one-person operation or don’t have workers roaming the store (from a loss-prevention perspective). Other ideas to consider when creating your checkout counter are:
- Have a large enough counter where customers can set their bags and/or other things.
- Avoid having your checkout counter facing away from the bulk of your store by making use of the wall behind the desk to create appealing and engaging displays.
- Stocking things that people crave or frequently require close by will encourage spontaneous purchases.
- Asking queries like, “Were you able to find what you were looking for?” will show politeness. As well as on signage indicating your return or refund procedures.
Read more on INJ Architects: